Data Engineering Coursework Workflow
Setting Up an AWS EC2 Instance with SSH Access (AWS Linux)
1. Launch an EC2 Instance
- Navigate to the AWS Console → EC2 Dashboard → Instances → Launch Instance.
- Select an Amazon Machine Image (AMI): Choose an AWS Linux-based OS (e.g., Amazon Linux 2).
- Instance Type: Select a type such as
t2.micro(Free Tier eligible). - Key Pair:
- Select an existing key pair or create a new one.
- Download the
.pemfile and store it in a secure location. - Ensure that the security group allows SSH connections.
- Security Group Settings:
- Add an inbound rule to allow SSH (port 22) from your IP address.
- Launch the Instance: Proceed to launch and wait until the instance is in the running state.
2. Set Up the Key Pair for SSH Access
Set Key Permissions
To enable SSH access, the .pem file must have appropriate permissions. Run the following command to set the correct permissions:
chmod 400 /path/to/key-pair/your-key.pem
This command should be executed in Git Bash (Windows) or a terminal (Mac/Linux) within the key file’s directory.
3. Connect to Your EC2 Instance
Method 1: Using Terminal or Git Bash
-
In the EC2 Dashboard, click on the Instance ID.
-
Select the Connect button and navigate to the SSH Client tab for connection details.
-
Execute the following SSH command, replacing the placeholders with actual values:
ssh -i /path/to/key-pair/your-key.pem <usernamex>@<your-ec2-public-dns>Example:
ssh -i C:/Users/Ethan/Documents/key-pairs/SSH-TEST.pem ec2-user@ec2-13-48-67-243.eu-north-1.compute.amazonaws.com
Notes:
- The default username for AWS Linux instances is
ec2-user. - Ensure the path to your
.pemfile is correct and properly formatted.
Troubleshooting SSH Issues
If you encounter a "Permission denied" error:
-
Verify that the key file permissions are set correctly using
chmod 400 your-key.pem. -
Confirm the provided path to the key pair is accurate.
-
Check the security group settings to ensure SSH access is allowed from your IP.
-
For detailed debugging information, use the
-vvvoption:ssh -vvv -i "your-key.pem" ec2-user@<your-ec2-public-dns>
4. Connect Using Visual Studio Code (Optional)
Setting Up Remote SSH in VS Code
-
Install the Remote - SSH extension in Visual Studio Code.
-
Open the Command Palette (
Ctrl+Shift+P) and select Remote-SSH: Connect to Host. -
Configure the SSH settings in the
~/.ssh/configfile:Host EC2-Instance HostName ec2-13-48-67-243.eu-north-1.compute.amazonaws.com User ec2-user IdentityFile C:/Users/Ethan/Documents/key-pairs/SSH-TEST.pem -
Save the file and connect to the host using the Remote-SSH extension via the command palette.
Initializing the Weather API file to collect data from it
1. Setting up python and the coding space for it
- In order to install python on the EC2 instance, first install
yumwhich acts as the installer for applications on AWS linux:
sudo yum update -y # Updates yum to its latest version
sudo yum install -y python3
- Having installed yum proceed to install the required dependencies, but to do so
pipneeds to be installed so the following command was regarded:
sudo yum install -y python3-pip
- Thereafter installing
pip, install virtual environments to setup.venv's in the instance for good coding etiquette (and refined spaces for each code space):
pip install virtualenv
- Switch into that environment through the following
yumcommand:
virtualenv {env-name} # Create the environment
source {envrionment_name}/bin/activate # Switch into the created environment
- Run the following commands to install the required dependencies for the project
pip install requests
pip install dotenv # To read environmental variables
pip install "apache-airflow==2.10.5" apache-airflow-providers-google==10.1.0 # Install command for apache airflow
2. Creating the code for the project
- Create an
.envfile to store the API key in it like so (ensure you add a gitignore file to the subfolder to exclude any contents within the folder):
OPENWEATHER_API_KEY = {api_key}
- Create the python file outside of the
.envfiles environment and paste in the following code:
import requests

import os

import csv

from dotenv import load_dotenv


# Load environment variables from env_variables/api.env

env_path = os.path.join(os.path.dirname(__file__), 'env_variables', 'api.env')

if not os.path.exists(env_path):

    print(f"Error: {env_path} not found.")

else:

    load_dotenv(env_path)


# Retrieve API key

API_KEY = os.getenv("OPENWEATHER_API_KEY")


# Debug check: Ensure the API key is loaded

if not API_KEY:

    raise ValueError("API key not found. Check your .env file and variable name.")


CITY = "London"

URL = f"http://api.openweathermap.org/data/2.5/weather?q={CITY}&appid={API_KEY}&units=metric"


try:

    response = requests.get(URL)

    response.raise_for_status()  # Raises HTTPError for bad responses

    data = response.json()


    # Extract weather data

    temperature = data['main']['temp']

    weather_description = data['weather'][0]['description']

    humidity = data['main']['humidity']

    wind_speed = data['wind']['speed']


    print(f"City: {CITY}")

    print(f"Temperature: {temperature}°C")

    print(f"Weather: {weather_description}")

    print(f"Humidity: {humidity}%")

    print(f"Wind Speed: {wind_speed} m/s")


    # CSV file path

    csv_file = 'weather_data.csv'


    # Check if the CSV file exists to write headers only once

    file_exists = os.path.isfile(csv_file)


    # Write data to CSV

    with open(csv_file, mode='a', newline='') as file:

        writer = csv.writer(file)

        if not file_exists:

            # Write headers if the file is new

            writer.writerow(["City", "Temperature (°C)", "Weather", "Humidity (%)", "Wind Speed (m/s)"])

        # Write weather data

        writer.writerow([CITY, temperature, weather_description, humidity, wind_speed])


    print(f"\nData saved to {csv_file}")


except requests.exceptions.HTTPError as err:

    print(f"HTTP Error: {err} - {response.json().get('message')}")

except Exception as e:

    print(f"An error occurred: {e}")
- Some of the features of the code above include the following:
- Creates CSV file containing the data
- Collects data from the WeatherAPI while utilizing the API key from an
.envfile
3. Linking the S3 bucket to upload the csv file
-
In order to link the S3 bucket to the instance you first need setup an IAM rule for the bucket and link it to the instance by going into the instances rules and adding an IAM rule
-
Thereafter doing so you need to setup an IAM user to get a secret key and key ID to link to the code (by placing it in the
.envfile). Doing so would then enable you to useboto3to upload data into the bucket from the python code- When creating the IAM user, ensure that he is granted full
S3access rights such that they can read, write and delete files- The users access policy is called
AmazonS3FullAccess
- The users access policy is called
- Also, ensure that you've included an IAM rule for the S3 bucket in the instance to ensure the instance has full edit access in the bucket
- When creating the IAM user, ensure that he is granted full
Setting Up Apache Airflow on AWS EC2
Airflow is simply an automation tool that enables you to schedule ETL workflows (in other words, DAG's) to carry out tasks in scheduled periods of time. The reason you use airflow is to automate tasks in ETL pipelines such that data extraction, transforming and loading can be done in scheduled times
It may be stated that airflow is simply a tool used to orchestrate ETL workflows to carry out tasks in scheduled periods of time. It ensures that whatever tasks have been scheduled under it occur in the correct time.
A DAG (Directed Acyclic Graph) is simply the blueprint used to define the workflow of an ETL pipeline by specifying where the extraction takes place, where the transformations take place and where the data transformed is to be loaded into. Refer to the following subpoints to see what each term in DAG means:
- Directed - States that the flow is only towards one side, so a task cannot back track
- Acyclic - States that there are no loops in the workflow so there can be no repetitions of the same task in an endless loop
- Graph - Visual Representation of different tasks
The DAG developed for the coursework is to regard the following layout:
1. Installing Apache Airflow
To install Apache Airflow, you need to ensure that the environment is properly set up.
-
Update the system packages:
sudo yum update -y -
Ensure Python is installed (if not already installed in previous steps):
sudo yum install -y python3 -
Upgrade
pipand install Apache Airflow with necessary providers:python3 -m pip install --upgrade pip pip install "apache-airflow==2.10.5" apache-airflow-providers-amazon -
Set the AIRFLOW_HOME environment variable:
export AIRFLOW_HOME=~/airflow -
Initialize the Airflow database:
airflow db init
2. Configuring Airflow
-
Set up an Airflow user account:
airflow users create \ --username admin \ --firstname Admin \ --lastname User \ --role Admin \ --email admin@example.com -
Start the Airflow web server:
airflow webserver --port 8080- The webserver should now be running on
http://<EC2-Public-IP>:8080/. - If needed, open port 8080 in the AWS Security Group for external access.
- The webserver should now be running on
-
Start the Airflow scheduler:
airflow scheduler
3. Running an Airflow DAG to Process Weather Data
To automate data collection and upload it to S3, create an Airflow DAG.
-
Create the DAG directory and Python script:
mkdir -p ~/airflow/dags nano ~/airflow/dags/weather_data_dag.py -
Add the following DAG script:
from airflow import DAG from airflow.operators.python import PythonOperator from datetime import datetime, timedelta import requests import csv import os from dotenv import load_dotenv import boto3 # Load environment variables load_dotenv(os.path.expanduser("~/airflow/env_variables/api.env")) API_KEY = os.getenv("OPENWEATHER_API_KEY") CITY = "London" URL = f"http://api.openweathermap.org/data/2.5/weather?q={CITY}&appid={API_KEY}&units=metric" def fetch_weather_data(): response = requests.get(URL) response.raise_for_status() data = response.json() temperature = data['main']['temp'] weather_description = data['weather'][0]['description'] humidity = data['main']['humidity'] wind_speed = data['wind']['speed'] csv_file = '/tmp/weather_data.csv' file_exists = os.path.isfile(csv_file) with open(csv_file, mode='a', newline='') as file: writer = csv.writer(file) if not file_exists: writer.writerow(["City", "Temperature (°C)", "Weather", "Humidity (%)", "Wind Speed (m/s)"]) writer.writerow([CITY, temperature, weather_description, humidity, wind_speed]) def upload_to_s3(): s3 = boto3.client( "s3", aws_access_key_id=os.getenv("AWS_ACCESS_KEY_ID"), aws_secret_access_key=os.getenv("AWS_SECRET_ACCESS_KEY"), ) s3.upload_file("/tmp/weather_data.csv", "test-bucket-ethan-0101", "weather_data.csv") default_args = { 'owner': 'airflow', 'depends_on_past': False, 'start_date': datetime(2024, 2, 26), 'retries': 1, 'retry_delay': timedelta(minutes=5), } dag = DAG( 'weather_data_pipeline', default_args=default_args, description='Fetch weather data and upload to S3', schedule_interval=timedelta(hours=1), ) task1 = PythonOperator( task_id='fetch_weather_data', python_callable=fetch_weather_data, dag=dag, ) task2 = PythonOperator( task_id='upload_to_s3', python_callable=upload_to_s3, dag=dag, ) task1 >> task2 -
Restart Airflow to apply changes:
airflow scheduler & airflow webserver --port 8080 & -
Check the DAG in the Airflow UI (
http://<EC2-Public-IP>:8080).
4. Automating Apache Airflow with System
To keep Airflow running persistently, configure it as a system service.
-
Create a service file for the webserver:
sudo nano /etc/systemd/system/airflow-webserver.service -
Add the following:
    [Unit]
    Description=Airflow Web Server
    After=network.target

    [Service]
    User=ec2-user
    Group=ec2-user
    Environment="AIRFLOW_HOME=/home/ec2-user/airflow"
    ExecStart=/home/ec2-user/.local/bin/airflow webserver --port 8080
    Restart=always

    [Install]
    WantedBy=multi-user.target
-
Create a service file for the scheduler:
sudo nano /etc/systemd/system/airflow-scheduler.service -
Add the following:
    [Unit]
    Description=Airflow Scheduler
    After=network.target

    [Service]
    User=ec2-user
    Group=ec2-user
    Environment="AIRFLOW_HOME=/home/ec2-user/airflow"
    ExecStart=/home/ec2-user/.local/bin/airflow scheduler
    Restart=always

    [Install]
    WantedBy=multi-user.target
-
Enable and start both services:
sudo systemctl enable airflow-webserver sudo systemctl enable airflow-scheduler sudo systemctl start airflow-webserver sudo systemctl start airflow-scheduler -
Verify Airflow is running:
sudo systemctl status airflow-webserver
sudo systemctl status airflow-scheduler
Workflow for part one of the coursework
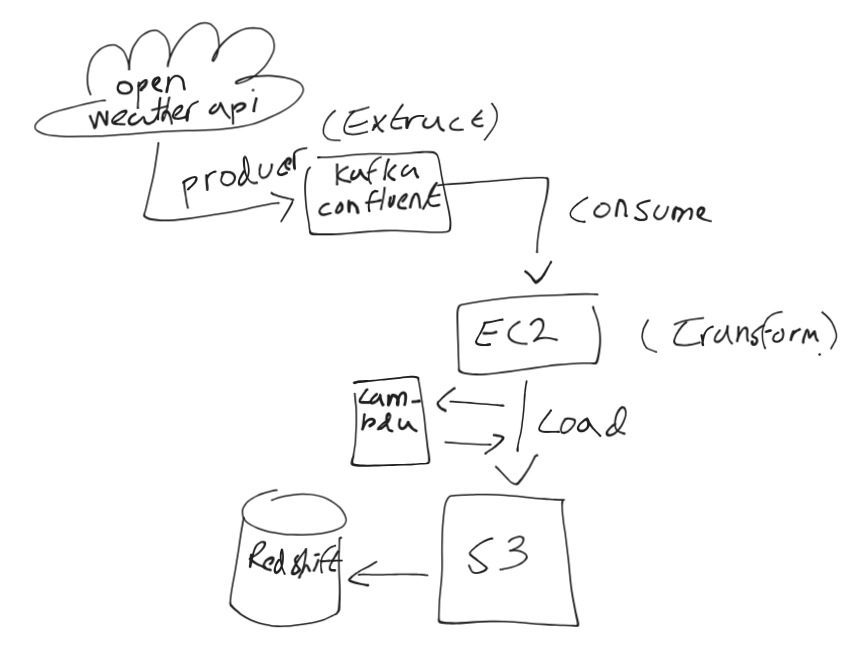
Steps to Implement Kafka-Based Data Pipeline for OpenWeather API → AWS Redshift
1️. Extract Data from OpenWeather API (Producer)
🔹 Set up Kafka Producer to fetch data from OpenWeather API at scheduled intervals.
🔹 Use Python (or any language) to request weather data and send it to Kafka.
Steps:
- Create a Kafka topic (e.g.,
weather-data). - Set up a Kafka producer script to fetch weather data:
- Use
requestsin Python to get data from OpenWeather API. - Format data as JSON.
- Send it to Kafka using
confluent_kafkalibrary.
- Use
- Deploy the producer on an EC2 instance to run periodically using cron jobs or AWS Lambda.
Sample Kafka Producer in Python
from confluent_kafka import Producer
import requests
import json

# Kafka configuration
conf = {'bootstrap.servers': 'your_kafka_broker'}
producer = Producer(conf)

# OpenWeather API details
API_KEY = "your_api_key"
CITY = "London"
URL = f"http://api.openweathermap.org/data/2.5/weather?q={CITY}&appid={API_KEY}"

def fetch_weather():
    response = requests.get(URL)
    data = response.json()
    producer.produce('weather-data', key="weather", value=json.dumps(data))
    producer.flush()

fetch_weather()
2. Consume Data from Kafka & Transform (EC2)
🔹 Set up a Kafka consumer on an EC2 instance to read the weather data from Kafka.
🔹 Transform the data (e.g., filter necessary fields, convert formats).
Steps:
- Create a Kafka consumer script to read weather data.
- Transform data (e.g., extract temperature, humidity, and store as CSV/JSON).
- Save the transformed data to an S3 bucket using AWS SDK.
Sample Kafka Consumer in Python
from confluent_kafka import Consumer
import json
import boto3

# Kafka Consumer Config
conf = {
    'bootstrap.servers': 'your_kafka_broker',
    'group.id': 'weather-consumer-group',
    'auto.offset.reset': 'earliest'
}
consumer = Consumer(conf)
consumer.subscribe(['weather-data'])

# AWS S3 Config
s3_client = boto3.client('s3')
S3_BUCKET = "your-s3-bucket"

def process_messages():
    while True:
        msg = consumer.poll(1.0)
        if msg is None:
            continue
        data = json.loads(msg.value().decode('utf-8'))

        # Extract relevant fields
        transformed_data = {
            "city": data["name"],
            "temperature": data["main"]["temp"],
            "humidity": data["main"]["humidity"]
        }

        # Save to S3 as JSON
        s3_client.put_object(
            Bucket=S3_BUCKET,
            Key=f"weather/{data['name']}.json",
            Body=json.dumps(transformed_data)
        )

process_messages()
3️. Load Data to S3
🔹 Store transformed weather data in an S3 bucket (as JSON, CSV, or Parquet).
Steps:
- Create an S3 bucket in AWS (
your-s3-bucket). - Ensure IAM roles allow EC2 to write to S3 (
PutObjectpermission). - Use the S3 SDK in the consumer script to upload transformed data.
4️. Trigger AWS Lambda to Load Data to Redshift
🔹 Use AWS Lambda to trigger Redshift COPY command from S3.
Steps:
- Create an AWS Lambda function to load data into Redshift.
- Use
COPYcommand in SQL to transfer data from S3 to Redshift. - Schedule Lambda execution using Amazon EventBridge (CloudWatch).
Lambda Code to Load Data into Redshift
import psycopg2
import boto3

# Redshift Connection
conn = psycopg2.connect(
    dbname="your_db",
    user="your_user",
    password="your_password",
    host="your_redshift_endpoint",
    port="5439"
)

# SQL COPY Command
def load_data_to_redshift():
    cur = conn.cursor()
    sql = """
    COPY weather_data
    FROM 's3://your-s3-bucket/weather/'
    IAM_ROLE 'your-redshift-iam-role'
    FORMAT AS JSON 'auto';
    """
    cur.execute(sql)
    conn.commit()
    cur.close()

load_data_to_redshift()
5️. Query & Analyze Data in Redshift
🔹 Run queries to analyze and visualize weather trends.
Example SQL Queries
-- Check latest weather records
SELECT * FROM weather_data ORDER BY timestamp DESC;

-- Find the average temperature for each city
SELECT city, AVG(temperature) FROM weather_data GROUP BY city;
Summary of Steps
🔹 Extract
- Set up Kafka Producer to fetch weather data.
- Publish data to Kafka Confluent topic (
weather-data).
🔹 Transform
- Set up Kafka Consumer on EC2 to read & process data.
- Save transformed data to S3.
🔹 Load
- Use AWS Lambda to trigger Redshift COPY command from S3.
- Store structured weather data in Redshift for analytics.
Step 6: Monitor ETL Pipeline to Ensure Continuous Data Ingestion
To ensure the ETL pipeline is always running and data is being ingested correctly from OpenWeather API to EC2, we need to monitor Kafka and EC2 logs and set up alerts.
Implementation Steps
1️. Enable Kafka Monitoring with Prometheus & Grafana
Kafka exposes metrics that can be scraped using Prometheus and visualized with Grafana.
Steps to Monitor Kafka:
-
Install Prometheus on EC2
sudo apt update && sudo apt install prometheus -y -
Configure Prometheus to scrape Kafka metrics
Edit Prometheus config (/etc/prometheus/prometheus.yml):scrape_configs: - job_name: 'kafka' static_configs: - targets: ['localhost:9092'] -
Install Grafana on EC2
sudo apt install -y grafana sudo systemctl start grafana-server -
Create Kafka dashboards in Grafana to track:
- Number of messages produced (from OpenWeather API).
- Number of messages consumed (by EC2).
- Lag between producer & consumer.
2️. Monitor EC2 Logs & Set Up Alerts in CloudWatch
Steps to Track EC2 Consumer Logs
-
Enable CloudWatch Logs Agent on EC2
sudo yum install -y awslogs sudo systemctl enable awslogsd -
Configure the agent to monitor Kafka Consumer Logs (
/etc/awslogs/awslogs.conf)
    [kafka_consumer_logs]
    file = /var/log/kafka_consumer.log
    log_group_name = kafka-consumer-log-group
    log_stream_name = consumer-instance
-
Set Up CloudWatch Alarms
- Alert if log entries stop for 5 minutes (indicating failure).
- Alert if Kafka lag exceeds threshold.
3️. Implement a Heartbeat Check with AWS Lambda
Steps:
-
Create a Lambda Function to Check EC2 Health
import boto3 ec2 = boto3.client('ec2') cloudwatch = boto3.client('cloudwatch') def lambda_handler(event, context): response = ec2.describe_instance_status(InstanceIds=['your-ec2-instance-id']) # If instance is down, trigger an alert if not response['InstanceStatuses']: cloudwatch.put_metric_alarm( AlarmName='EC2 Down Alert', MetricName='StatusCheckFailed', Namespace='AWS/EC2', Statistic='Average', Threshold=1, ComparisonOperator='GreaterThanThreshold', Dimensions=[{'Name': 'InstanceId', 'Value': 'your-ec2-instance-id'}], EvaluationPeriods=1, Period=300, AlarmActions=['arn:aws:sns:your-sns-topic'] ) -
Set this function to run every 5 minutes using EventBridge.
4️. Auto-Restart Kafka Consumer if it Fails
- Create a Systemd Service for Kafka Consumer on EC2 (
/etc/systemd/system/kafka-consumer.service)
    [Unit]
    Description=Kafka Weather Consumer
    After=network.target

    [Service]
    ExecStart=/usr/bin/python3 /home/ubuntu/kafka_consumer.py
    Restart=always
    User=ubuntu

    [Install]
    WantedBy=multi-user.target
-
Enable the service
sudo systemctl enable kafka-consumer
sudo systemctl start kafka-consumer
Summary of Monitoring Setup
| Monitoring Component | Purpose |
|---|---|
| Prometheus & Grafana | Tracks Kafka producer & consumer metrics |
| CloudWatch Logs & Alarms | Alerts if EC2 logs stop or Kafka consumer fails |
| AWS Lambda Heartbeat | Checks if EC2 instance is running & restarts if needed |
| Systemd Auto-Restart | Ensures Kafka consumer restarts automatically |